


6 Ways to Best Preserve Carrots for Long Term Storage

A full carrot harvest can disappear faster than expected if it sits in a warm kitchen or damp garage. Carrots look tough, but once the greens keep pulling moisture from the roots or rot starts at the crown, storage life drops fast.
The good news is that carrots are one of the easiest crops to preserve. They can stay crisp in the ground, hold for months in a root cellar, dry down into lightweight pantry food, or last for years when canned or freeze-dried. The best method depends on your climate, storage space, power access, and how you plan to eat them later.
This guide covers the six best ways to preserve carrots for long term storage, from zero-power winter storage to serious emergency food reserves.

Match the storage method to your real needs
Before picking a preservation method, think about how you actually use carrots.
If you cook soups, stews, roasts, and pot pies all winter, root cellaring may give you the best texture. If you want lightweight food for camping or emergency bags, dehydration makes more sense. If you need jars that can sit on a pantry shelf for years and open ready to eat, pressure canning is the stronger choice.
Here is a quick comparison.
Method | Typical shelf life | Power needed after storage | Best use |
In-ground wintering | 4 to 6 months | None | Fresh carrots through winter |
Root cellaring | 4 to 6 months | None | Bulk fresh storage |
Dehydration | 1 to 2 years, longer with Mylar and oxygen absorbers | None | Soups, camp meals, compact storage |
Pressure canning | 2 to 5+ years | None | Ready-to-eat pantry food |
Freeze-drying | 20 to 25+ years when packed well | None | Long-term emergency food |
Lacto-fermentation | 6 to 12 months in cold storage | Cold storage preferred | Tangy probiotic-style side dishes |
No single method wins every category. A practical pantry often uses two or three. For example, keep some carrots fresh in damp sand, dehydrate the small ones, and pressure-can a few batches for fast meals.
Fresh storage keeps carrots crisp with little equipment
Fresh storage methods work because carrots are biennial roots. Their job is to store energy through winter. If you keep them cold, humid, and protected from freezing damage, they can stay usable for months.
The main rule is simple: remove most of the greens. Carrot tops keep drawing water from the root after harvest. That leads to limp, rubbery carrots even when the root itself has not spoiled.
1. In-ground wintering works well in mild to moderate winters
In-ground wintering is the simplest carrot storage method when the climate allows it. Instead of harvesting everything at once, you leave carrots where they grew and protect the soil from hard freezing.
This is best for homesteads and gardens with mild to moderate winter weather. It can work beautifully in areas where the ground freezes lightly but does not lock solid for months. In colder zones, the bed may become impossible to dig, or repeated freeze-thaw cycles may damage the roots.
To store carrots in the ground:
Wait until cool fall weather has settled in.
Before the first hard ground freeze, trim leafy tops down to about 1 inch.
Cover the carrot row with 10 to 12 inches of dry straw or dry leaf mulch.
Lay a plastic tarp over the mulch to shed rain and snow.
Weight the tarp edges with boards, bricks, or stones.
Pull back the cover and dig carrots as needed.
The mulch acts as insulation. The tarp keeps the bed from becoming a soaked, icy mat. Cold soil also makes carrots taste sweeter because the plant converts some stored starch into natural sugars as protection against cold.
This method requires no electricity, no canner, no jars, and no storage room. It also gives you carrots that still taste fresh because they are fresh.
There are a few limits. Voles and other rodents may discover the bed. Heavy clay soil can become difficult to dig. Warm spells can also restart growth or invite rot if the bed stays too wet.
Use this method when you want crisp winter carrots with almost no processing work.
Best for
Mild to moderate winter climates
Off-grid storage
Gardeners who want to harvest as needed
Short to medium storage through late fall and winter
Avoid it when
The ground freezes deeply for long periods
Rodents are a serious garden problem
The carrot bed drains poorly
You need shelf-stable food for emergencies
2. Root cellaring stores a large harvest without electricity
Root cellaring is the classic way to store carrots after harvest. It gives you fresh roots for months without using a refrigerator. The goal is to copy the conditions of cool, damp soil: cold temperatures, high humidity, and darkness.
A true root cellar is ideal, but many people use an unheated basement corner, insulated garage, buried trash can cellar, or other cold storage space. The target range is about 33°F to 38°F with 90% to 95% humidity. Too warm, and carrots sprout or soften. Too dry, and they shrivel. Too wet, and rot spreads.
Harvest after the first light frost if possible. Cool weather improves flavor and helps the carrots settle into storage. Lift them carefully with a garden fork instead of yanking them from hard soil. Bruised or cracked carrots should be eaten soon, dehydrated, fermented, or canned.
To pack carrots in sand, sawdust, or peat moss:
Cut the greens back to about 1/2 inch.
Do not wash the carrots.
Brush off large clumps of soil only if needed.
Add a layer of slightly damp sand, sawdust, or peat moss to a crate or tote.
Lay carrots in a single layer so they do not touch.
Cover with more packing material.
Repeat layers until the container is full.
Store the container in a cold, humid, dark place.
The packing material should feel damp like a wrung-out sponge, not wet. If water pools in the bottom, rot becomes more likely.
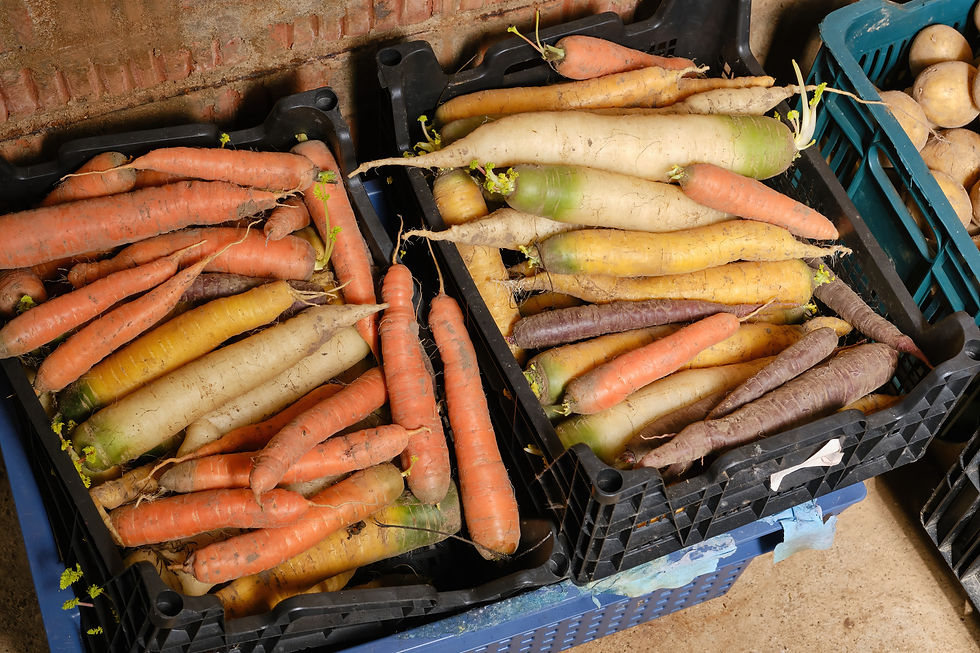
The reason carrots should not touch is rot control. If one carrot spoils, direct contact helps the problem spread. Sand or sawdust creates a small buffer around each root.
Check stored carrots every few weeks. Remove any that soften, mold, or smell off. If the packing material dries out, lightly mist it and mix gently. If it becomes wet or sour-smelling, replace it.
Root cellaring is one of the best methods for keeping carrots close to their original raw texture. You can grate them into slaw, roast them, simmer them, or eat them raw if they remain firm and clean after trimming and washing.
Best for
Large fresh harvests
No-power winter storage
People with a basement, cellar, garage, or cold room
Keeping raw texture for cooking and fresh eating
Main drawback
You need reliable cold storage. A garage that swings from freezing to warm may cause more damage than a steady refrigerator would.
Dry and shelf-stable methods make carrots ready for the pantry
Fresh storage is useful, but it has limits. It relies on cold conditions, and the carrots still behave like living roots. Drying, canning, and freeze-drying change the carrot enough that it can stay on a shelf.
These methods take more work at the start. In return, they make carrots easier to store, transport, and use in emergencies.
3. Dehydration makes carrots light, compact, and useful
Dehydrated carrots are one of the most practical pantry vegetables. They take up very little space, weigh almost nothing, and rehydrate well in hot liquid.
They are not the same as fresh carrots. They lose their crisp bite. But in soups, stews, rice dishes, casseroles, ramen, lentils, and camp meals, they are extremely useful.
To dehydrate carrots:
Wash and peel the carrots.
Slice or dice them into small, even pieces.
Blanch in boiling water for about 3 minutes.
Move them to an ice bath to stop cooking.
Drain well.
Dry at about 125°F in a dehydrator until hard and brittle.
Cool completely before packing.
Store in airtight jars or Mylar bags.
Blanching matters. It slows enzyme activity that can hurt color, texture, and flavor during storage. Skipping it may still produce dried carrots, but quality often drops faster.
Carrots must be fully dry before storage. Pieces should be hard, brittle, or leathery with no cool dampness inside. If in doubt, dry them longer. Moisture trapped in a sealed jar can lead to mold.
After drying, many people condition dehydrated vegetables. Place cooled carrots in a jar, loosely fill it, and shake once a day for several days. If condensation appears, return the carrots to the dehydrator.
For everyday pantry use, Mason jars with tight lids work well. For longer storage, use heat-sealed Mylar bags with oxygen absorbers. Stored in a cool, dark place, dehydrated carrots commonly keep 1 to 2 years. With careful drying, oxygen control, and strong packaging, they can last longer.
To use them, add dried carrots directly to boiling soup or stew. For faster cooking, soak them in hot water first. Very small dices rehydrate more quickly than thick slices.
Best for
Backpacking and bug-out bags
Small kitchens
Soup and stew ingredients
Long pantry storage without refrigeration
Main drawback
Dehydrated carrots are ingredients, not ready-to-eat vegetables in the same way canned carrots are.
4. Pressure canning creates ready-to-eat shelf-stable carrots
Carrots are a low-acid food. That means they must be pressure-canned for shelf-stable storage. Do not water-bath can plain carrots. A boiling water bath cannot reach the temperature needed to safely process low-acid vegetables, and unsafe canning can allow botulism toxin to form.
Pressure canning takes more equipment than dehydration or root cellaring, but it gives you jars of carrots that need no refrigeration until opened. In a power outage, storm, or busy week, that matters.
Use tested instructions from a trusted food preservation source, such as a university extension office or the USDA Complete Guide to Home Canning. Processing pressure varies by canner type and altitude, so do not rely on a single pressure number if you live above sea level.
A basic process looks like this:
Wash, peel, and trim carrots.
Slice, dice, or cut into chunks.
Prepare clean canning jars.
Pack carrots into hot jars.
Cover with boiling water.
Leave 1 inch of headspace.
Remove air bubbles.
Wipe rims and apply lids.
Process in a pressure canner using tested time and pressure.
For many standard instructions, carrots process for 25 minutes for pints and 30 minutes for quarts, with pressure adjusted for canner style and altitude. Weighted-gauge and dial-gauge canners use different pressure guidance, so read the manual and current tested directions.

Canned carrots soften during processing. They work best in soups, stews, shepherd’s pie, pot roast, casseroles, and quick side dishes. Drain and season them with butter, herbs, garlic, or a splash of broth.
Pressure-canned carrots are also convenient because they are already cooked. If fuel is limited, you can eat them straight from the jar after checking that the seal is sound and the food looks and smells normal. Never taste food from a jar that spurts, leaks, smells bad, appears moldy, or has a failed seal.
Best for
Ready-to-eat pantry reserves
Long-term storage without refrigeration
Emergency meals
People who already can vegetables or meats
Main drawback
You need a pressure canner, jars, lids, and the willingness to follow tested food safety steps exactly.
5. Freeze-drying gives the longest storage life
Freeze-drying is the premium method for long-term carrot storage. It removes nearly all moisture while preserving much of the carrot’s shape, color, flavor, and structure. When packed correctly, freeze-dried carrots can last 20 to 25 years or more in ideal storage conditions.
This method uses specialized equipment, such as a home freeze dryer. The machine freezes the food, then lowers pressure so ice turns into vapor and leaves the food. The result is very dry, lightweight carrot pieces that rehydrate better than standard dehydrated carrots.
You can freeze-dry raw sliced carrots, blanched carrots, or cooked carrots. Each gives a slightly different result.
Raw carrots may keep more of a fresh-carrot character after rehydrating. Blanched carrots often store with better quality. Cooked carrots are convenient for meals because they come back quickly in soups or hot water.
A basic freeze-drying workflow:
Wash and peel carrots.
Slice or dice evenly.
Blanch if desired for better long-term quality.
Pre-freeze on trays if your machine works better that way.
Run the freeze-dryer cycle until pieces are fully dry.
Check thick pieces for cold or damp spots.
Pack immediately in Mylar bags or jars.
Add oxygen absorbers for long storage.
Seal and label with the date.
Packaging is critical. Freeze-dried food absorbs moisture from the air quickly. If you leave trays out too long in a humid room, storage life drops. Use thick Mylar bags, often 7 mil for serious storage, plus the right size oxygen absorber.
Store sealed bags in a cool, dark place. Heat shortens shelf life, even when food is dry. Buckets or totes can protect Mylar from punctures and rodents.
Freeze-dried carrots shine in survival storage because they are extremely light and fast to cook. Add hot water, wait a few minutes, and they soften. Add them directly to soup, rice, pasta, or freeze-dried meal mixes.
Best for
Serious emergency food storage
Long shelf life
Lightweight pantry reserves
Preserving large harvests with little finished weight
Main drawback
The equipment costs far more than jars, sand, or a dehydrator. It also needs electricity during processing.
Fermentation preserves carrots while adding tangy flavor
Lacto-fermentation is different from the other methods because it preserves carrots through salt, acidity, and beneficial bacteria. It does not make carrots shelf-stable at room temperature forever, but it can keep them for months in cold storage.
Fermented carrots are crisp, salty, sour, and lively. They work well as a side dish, snack, sandwich topping, or chopped addition to grain bowls and salads.
6. Lacto-fermentation is ideal for cold storage and gut-friendly foods
Lacto-fermented carrot sticks are one of the easiest ferments to make. Carrots stay firm better than many vegetables, and they pair well with garlic, dill, ginger, chili flakes, mustard seed, or black pepper.
The standard brine range is 2% to 3% salt by weight. That means 20 to 30 grams of salt per 1,000 grams of water. A kitchen scale makes this much easier and more reliable than measuring salt by spoon, since grain size varies.
To ferment carrots:
Wash and peel carrots if desired.
Cut into sticks, coins, or small chunks.
Pack into a clean jar with garlic, dill, or spices.
Mix a 2% to 3% salt brine.
Pour brine over the carrots.
Keep all pieces fully submerged.
Use a fermentation weight or a small clean jar to hold them down.
Cover with a loose lid, airlock lid, or cloth secured with a band.
Ferment at room temperature for 7 to 14 days.
10. Move to cold storage when the flavor tastes pleasantly tangy.
Fermentation speed depends on room temperature. A warm kitchen ferments faster. A cool room takes longer. Taste after a week, then keep going until you like the sourness.
The most important rule is to keep carrots under the brine. Anything floating above the brine can grow mold. Cloudy brine, bubbles, and a sour smell are normal. Fuzzy mold, pink slime, or a rotten smell are not normal. When in doubt, throw it out.
Fermented carrots usually keep 6 to 12 months in cold storage, though texture is best earlier. A refrigerator gives the most stable results. A very cool cellar can also work if it stays consistently cold.

Fermented carrots are often valued for live cultures when they have not been heat processed. They should still be treated as food, not medicine. Enjoy them for flavor, variety, and traditional preservation.
Best for
Crisp, tangy snacks
Cold storage preservation
Off-grid food variety
Small-batch preserving
Main drawback
Fermented carrots need cool storage after fermentation, and the flavor is sour rather than neutral.
Prepare carrots correctly before storing them
Good storage starts before the preservation method. Damaged, diseased, or poorly cured carrots will not improve in storage. Set yourself up with careful harvest and sorting.
Harvest during cool weather when possible. Carrots pulled from hot soil do not store as well as carrots harvested after fall temperatures arrive. Loosen the soil with a garden fork to avoid snapping long roots.
Sort carrots into groups:
Perfect, firm carrots
Use these for root cellaring, in-ground storage, or long-term processing.
Small carrots
Dehydrate, ferment, or can them.
Cracked or forked carrots
Eat soon, ferment, dehydrate, or can after trimming.
Soft, moldy, or rotten carrots
Compost them if safe to do so. Do not preserve spoiled food.
For fresh storage, keep washing to a minimum. Soil can help protect the skin if it is not wet and heavy. For canning, dehydration, freeze-drying, and fermentation, wash well and peel if the method calls for it or if the skins are tough.
Label everything. Include the method, date, and any seasoning. Six months later, “carrots with garlic and dill, October 2026” is much more useful than an unmarked jar.
Choose the best method for your storage goal
The best carrot preservation method is the one that fits your kitchen, climate, and eating habits.
If you want the least work and you have mild winters, leave carrots in the ground under deep mulch. If you want fresh carrots by the crate, pack them in damp sand or sawdust. If you need compact ingredients, dehydrate them. If you want ready-to-eat jars, pressure-can them safely. If you are building a decades-long food reserve, freeze-dry them. If you want crunch, tang, and cold-storage variety, ferment them.

A strong carrot storage plan often looks like this:
If your priority is | Use this method |
Zero equipment | In-ground wintering |
Fresh texture | Root cellaring |
Small storage space | Dehydration |
Ready-to-eat meals | Pressure canning |
Maximum shelf life | Freeze-drying |
Tangy flavor and live-culture foods | Lacto-fermentation |
Do not feel locked into one choice. Carrots are flexible. Preserve the best roots fresh, process the damaged ones, and put a few jars or bags away for the future. That way, one harvest can feed you through winter, fill the pantry, and add real variety to your long-term food storage.


Comments